Happy Little Artist!
November 12, 2018 4 Comments


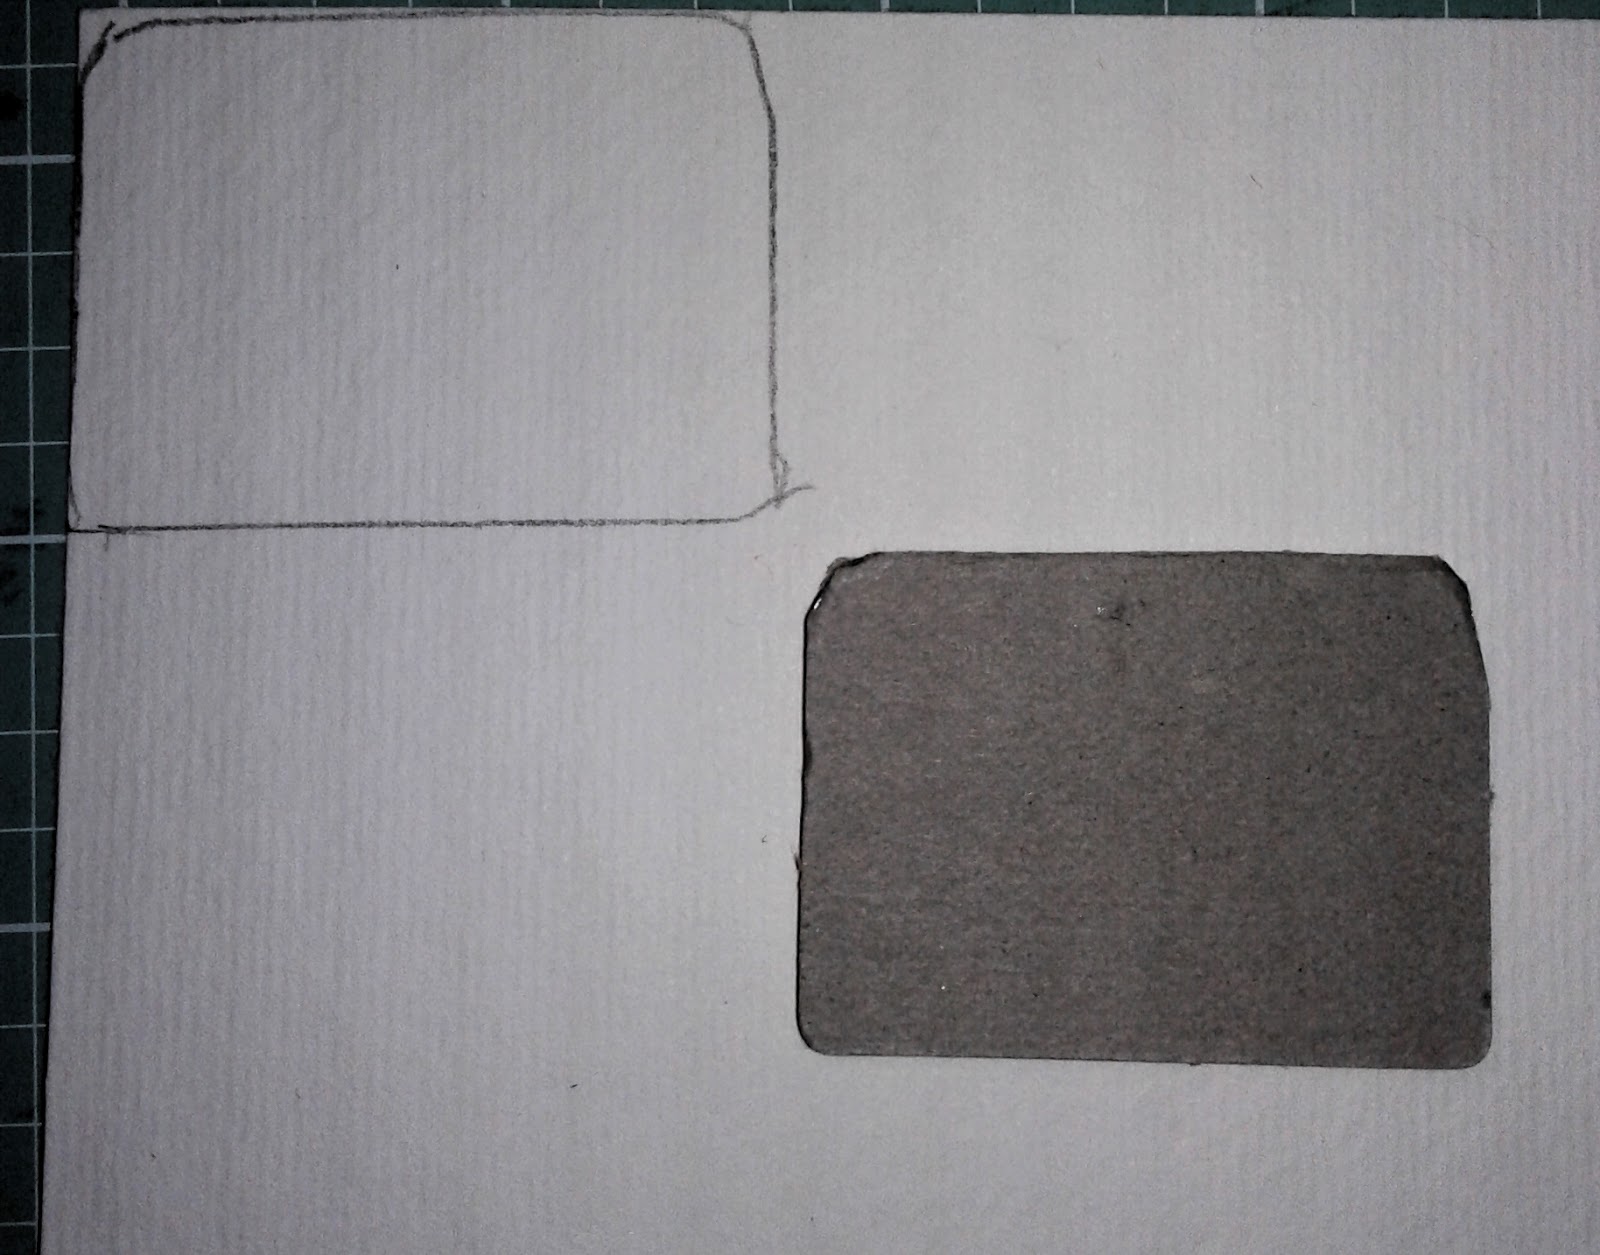
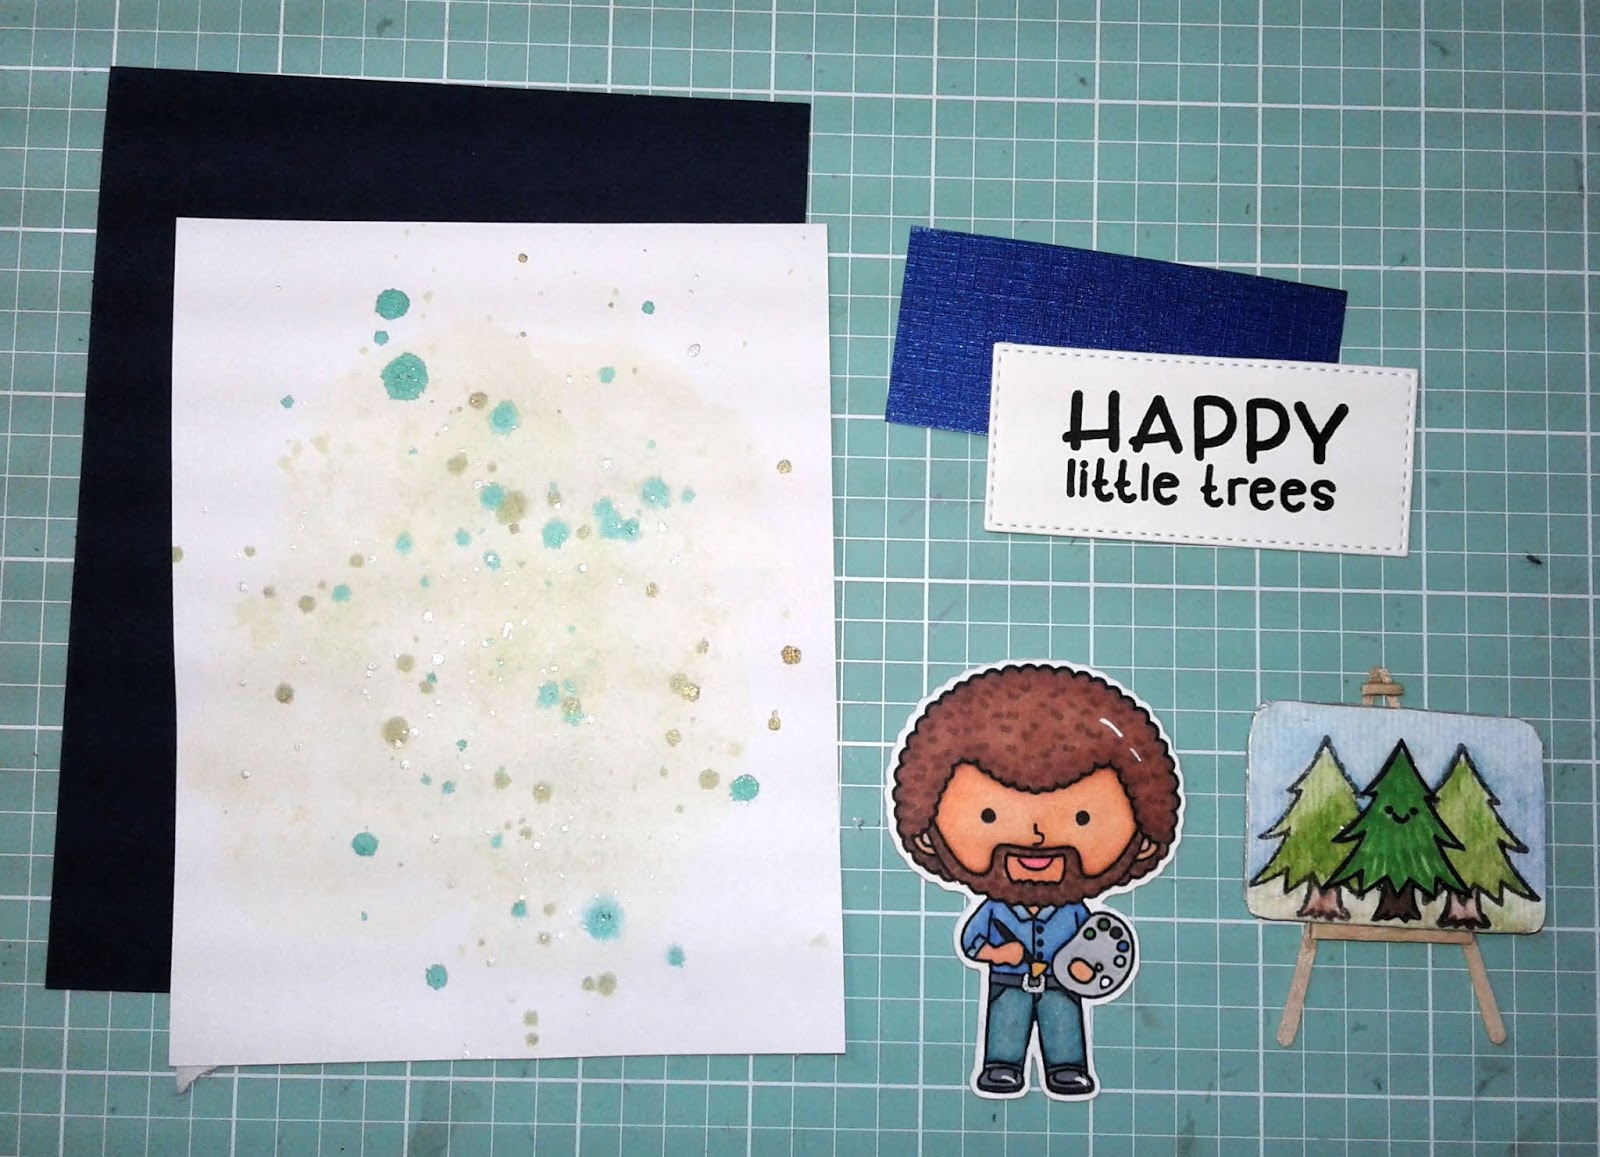
Let's get started on this quick tutorial. I started by tracing the chipboard square piece onto water color paper. Then, I stamped the little tree onto the water-color paper making sure to wipe off the face before stamping it. I used Versafine Onxy Black ink.

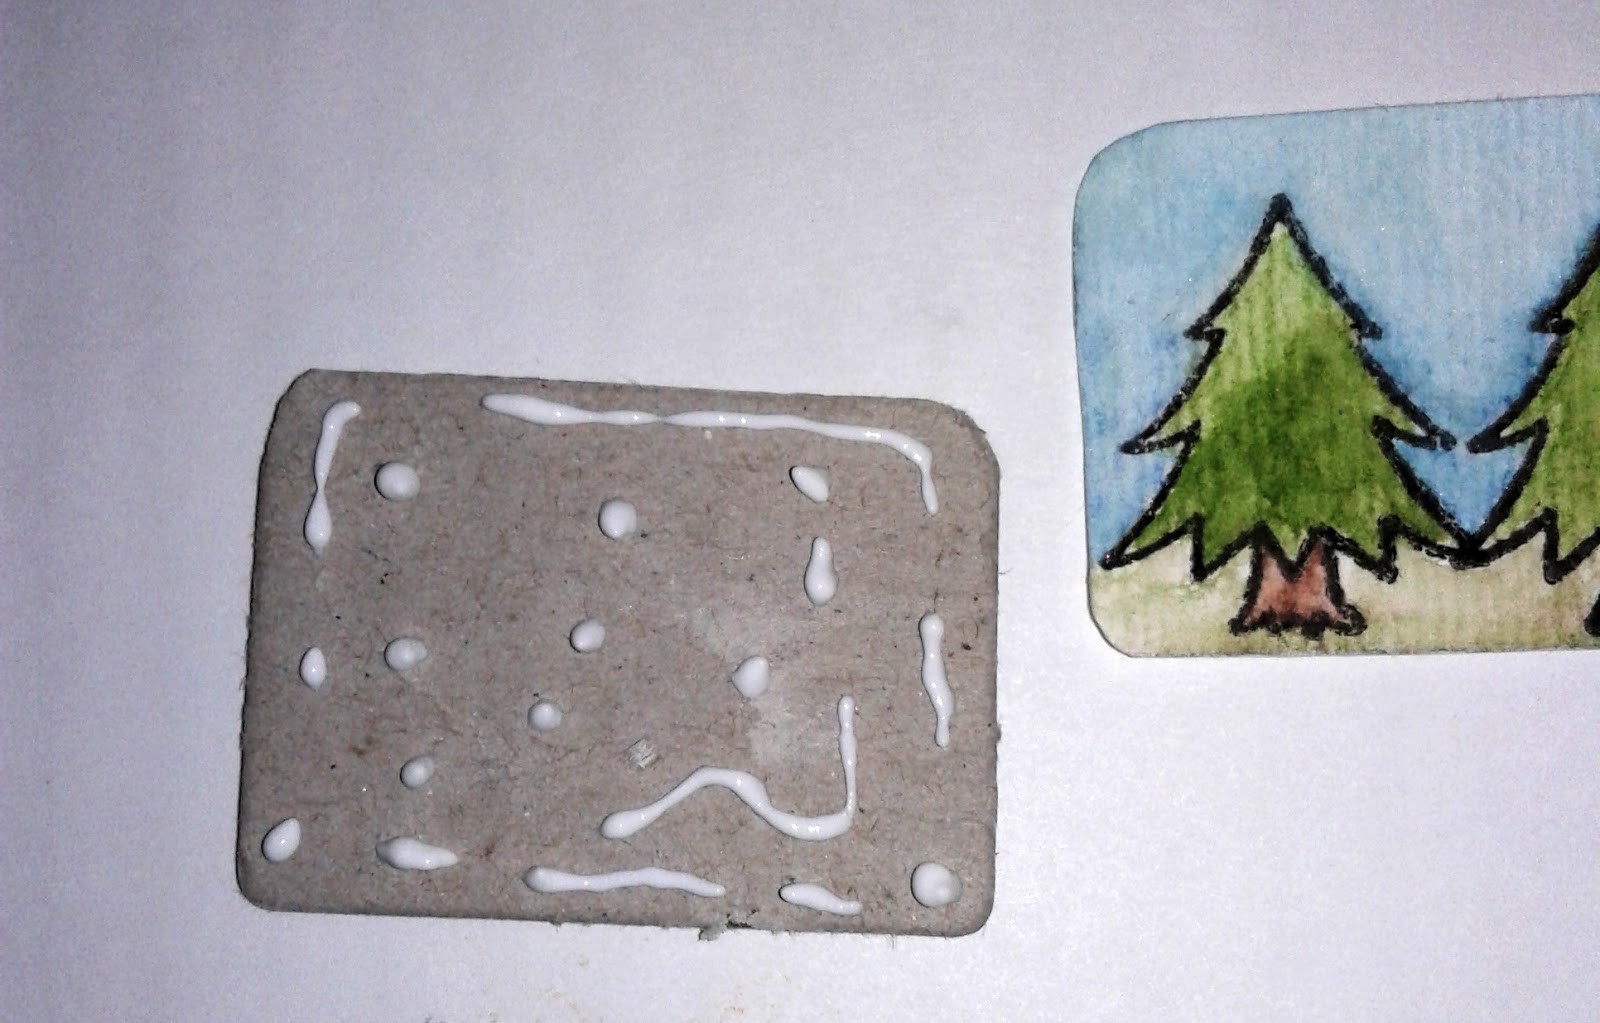
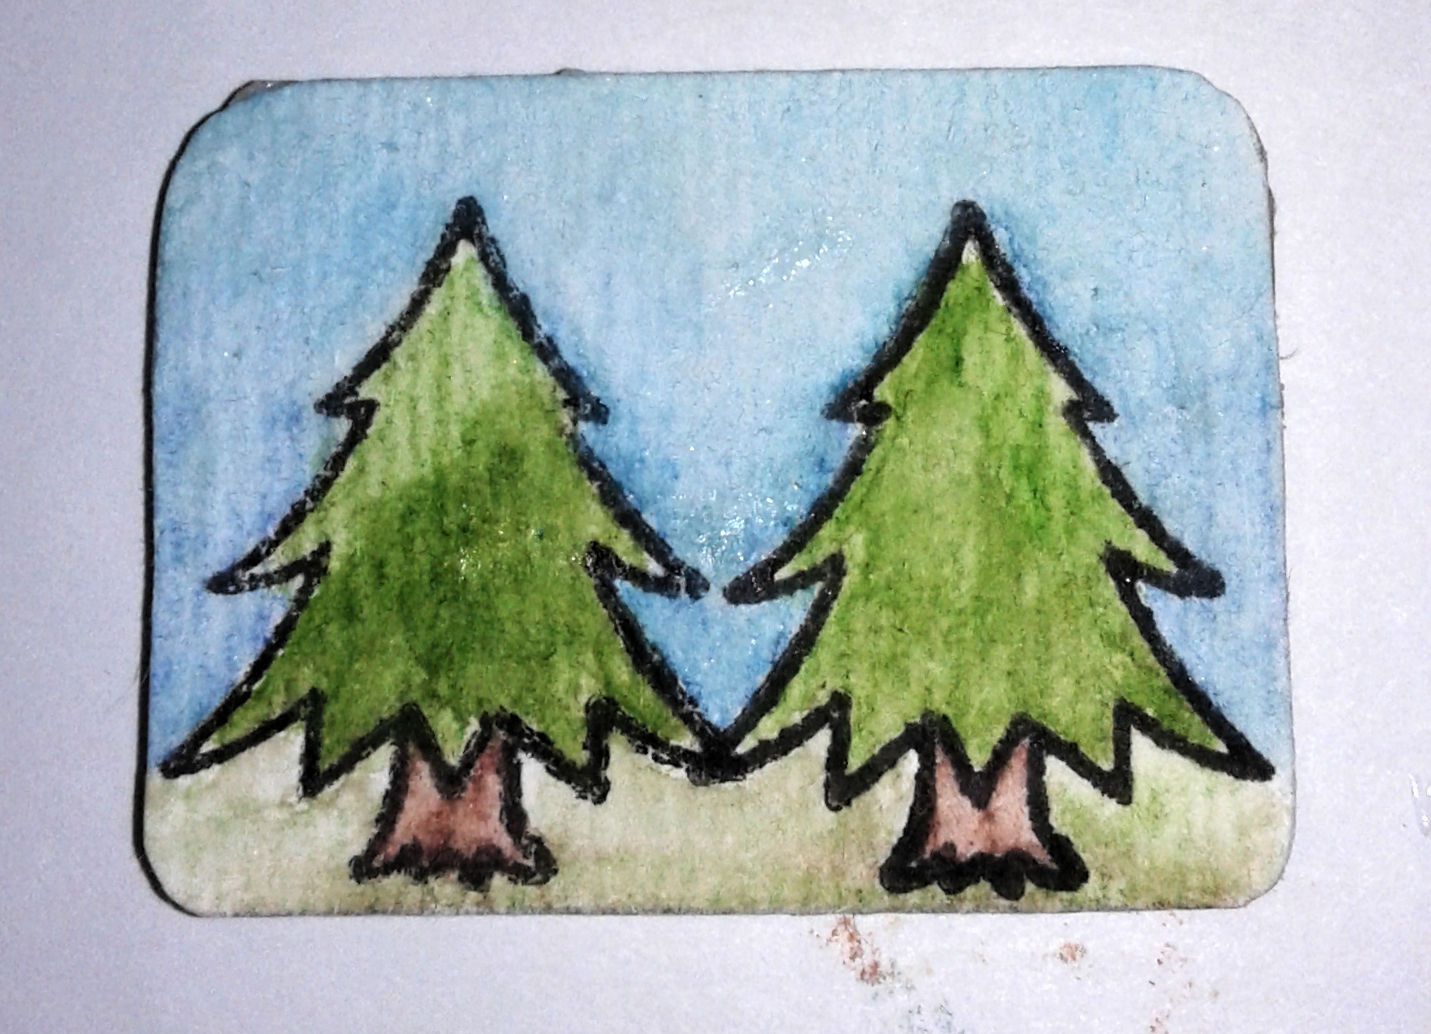
I then, used my Faber-Castell water-color pencils to color the images. I used a small paint brush & water to move the color. I set it aside to dry.

Once the images where dry I trimmed it down - following the pencil lines. I then adhered the little painting onto the chipboard piece. I then stamped and colored with my Spectrum Noir Marker the little tree as well as the artist. I then trimmed it and adhered it to the little painting. Placing an acrylic block on top of it.


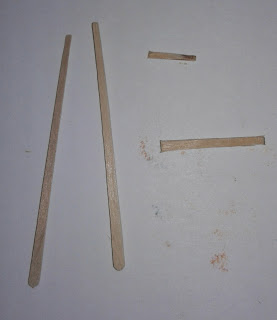
Now, To create the easel. I used 3 toothpicks for the easel. I cut one into 3 pieces. I only used 2 of those pieces. I started by gluing the 2 full toothpicks along with the larger of the 2 cut pieces - forming a capital A. Then I added the little piece to the top. Set aside to dry.


Once the little painting and easel were dry I adhered them together. set aside to dry.

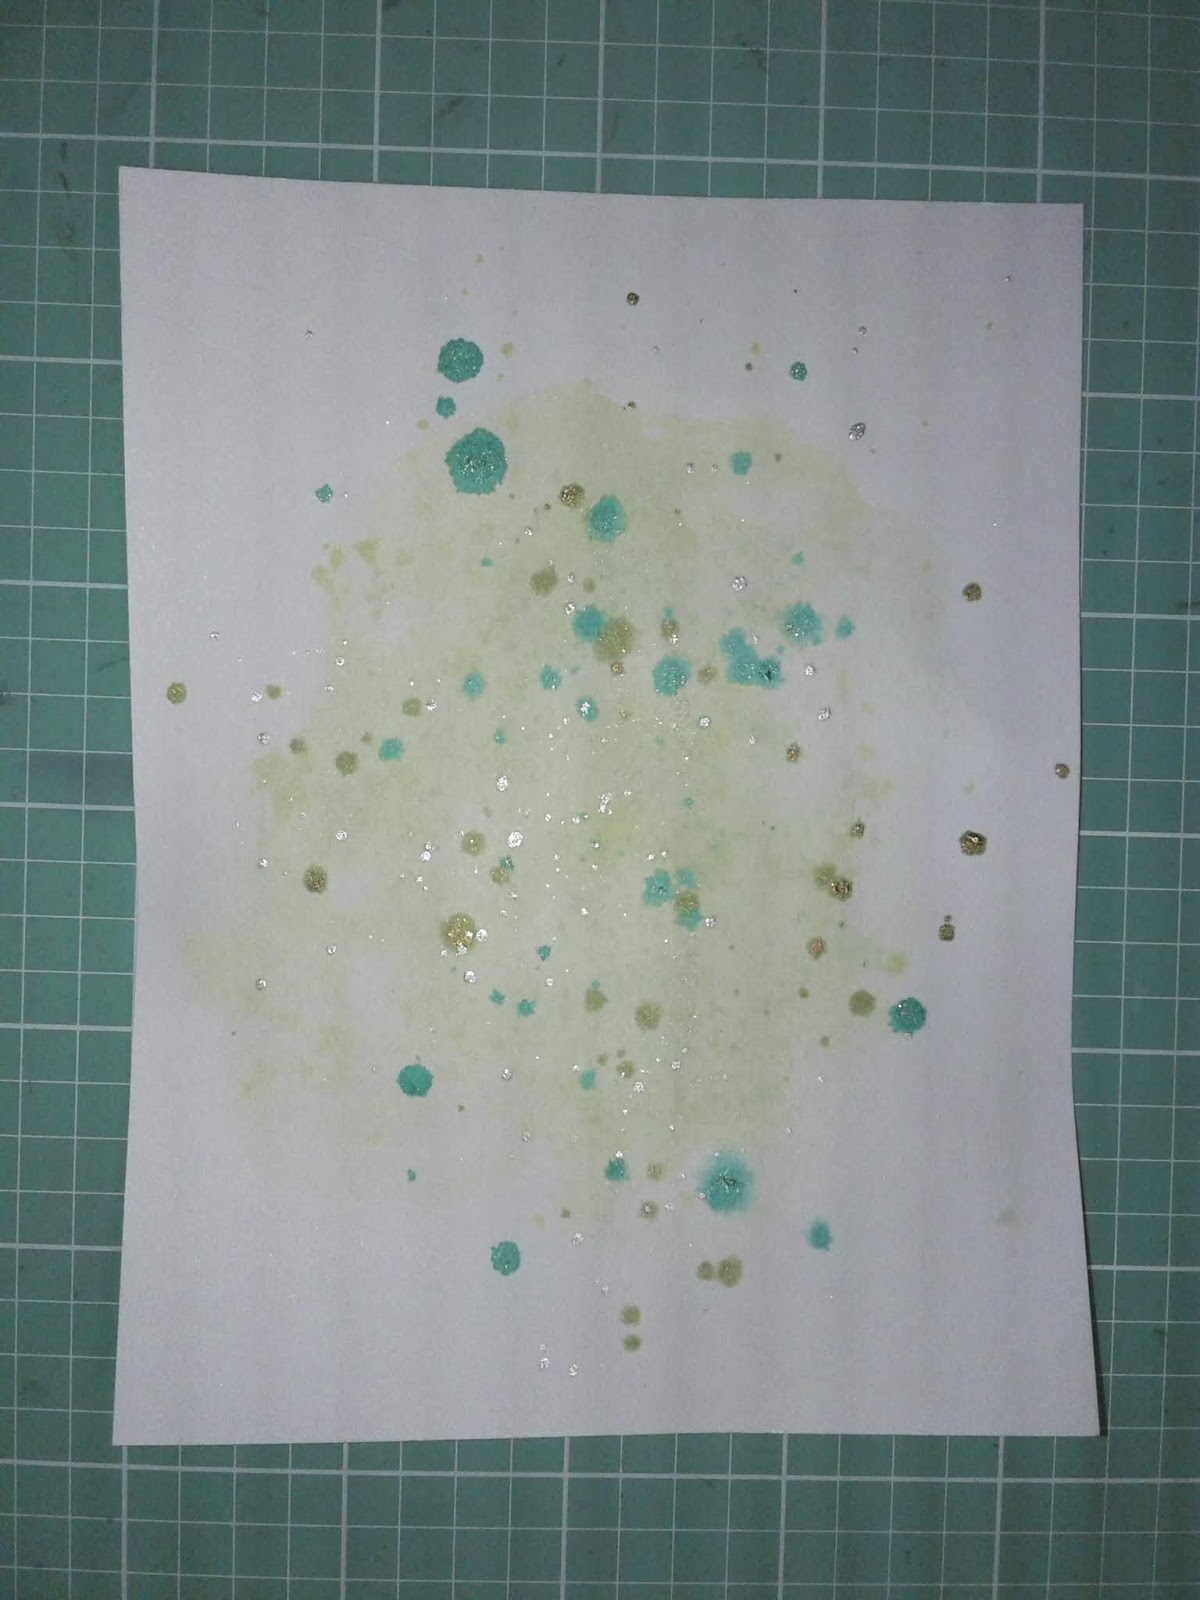
Now, I created the background to the front panel of the card. On heavy weight white card stock I did a bit of water-color wash with Distress ink in Twisted Citron and Crushed Olive. Then I did a bit of sprinkle with Heidi Swapp Color Shine in Tinsel, Citron and Teal. Set aside to dry.
Then, I stamped the sentiment onto heavy weight white card stock. I then die cut it using a rectangle stitched die.

Now, that all of the components are all ready - it's time to put our card together. I adhered the front panel on to Dark Navy card base. I adhered the sentiment onto shiny Navy card stock. Add a bit of thin foam to the back of the easel so that it laid even on the card. I also add a bit of thick foam tape to the artist. I placed the painting to the bottom right of the card front and the artist to the left of the card. Next, I placed the sentiment a bit to right.

4 Responses

Anita Monaldi
November 12, 2018
This is wonderful ! Where can I get the Bob Ross stamp? Oops! I see it! Thanks!
Anita Monaldi
November 12, 2018
This is wonderful ! Where can I get the Bob Ross stamp?
Anita Monaldi
November 12, 2018
This is wonderful ! Where can I get the Bob Ross stamp?
Leave a comment
Comments will be approved before showing up.
Also in Features


Subscribe
Sign up to get the latest on sales, new releases and more …
Recent Articles
-
March Release Day 4 - Get Lost
March 26, 2026
-
March Release Day 3 - Pocket Park
March 25, 2026
-
March Release Day 2 - Happy Campers
March 24, 2026
-
March Release Day 1 - Fab Friends
March 23, 2026
-
Kindred Stamps Mini Pocket Letter Swap
March 04, 2026
-
February release
February 26, 2026
-
January Release
January 29, 2026
-
December 2025 Release
December 18, 2025
-
November Release Day 4 - Imagination
November 20, 2025
-
November Release Day 3 - Pocket Tower
November 19, 2025
Categories
- ##reststopbeaver
- #99%pure
- #ack
- #adventurepals
- #Adventuresintimeandspace
- #ahoymatey
- #Aliens
- #allaboard
- #Alldolleduppaperpack
- #AmberMacMurtry
- #animatedpals
- #AnimatedRoyalty
- #arcadedieset
- #arcadestampset
- #BackgroundStamping
- #badguyshavemorefun
- #bard
- #BEARYSWEET
- #BeYou
- #bikers
- #bloodbrothers
- #boocrewpaperpack
- #boxdieset
- #broadwayboys
- #broomhaha
- #Building Blocks
- #Bunghole
- #burgerfamily
- #cafevibes
- #cakeeater
- #careerdaybooks
- #careerseries
- #careerserieslegal
- #celestialstencil
- #Cherriesontoppaper
- #Cityskylinecraftdie
- #classof1992
- #Clochedie
- #compositionbook
- #constructionpaperpack
- #coordinatingdies
- #CopicColoring
- #Cornycruise
- #Cribmates
- #cupofcheer
- #cursivecurses
- #cutefriends
- #defyingfriendships
- #desertcouple
- #Dieboxset
- #Dinoorigins
- #DinoReboot
- #dogfamily
- #Dolls
- #DoodlesPaperPlayground
- #Dopefriends
- #dreamcouple
- #dropin
- #Education
- #emotionalrollercoaster
- #enchantedcrooners
- #extraspecial
- #fairyclochedie
- #fairytaletown
- #familycanbescary
- #familychoir
- #fastfoodpaperpack
- #flyaway
- #Freakin sweet
- #freedom
- #Friendlyspirits
- #friendshipbraceletkit
- #Fruity friends
- #galactichunter
- #gazebodieset
- #Geez
- #GenesBonus
- #GetAnimated
- #GhoulGirls
- #ghoulsquad
- #giftboxdie
- #giftcarddie
- #Gingerbreadpals
- #Giveaway
- #gothvibespaperpack
- #greekpaper
- #halloween
- #HeatEmbossing
- #heathertyler
- #herewego
- #HoldingSpace
- #holidayclause
- #holidayhugs
- #holidaypaperpack
- #holidayscenes
- #holidayshops
- #Hollowfamily
- #hollowfriends
- #Horrorfinale
- #HorrorReboot
- #horrortrilogy
- #Horsingaround
- #Howler
- #immortals
- #ineffablelove
- #InkTechniques
- #insects
- #januaryrelease
- #Judges
- #junglelife
- #justice
- #KerriBoucher
- #Killer
- #kindredcareers
- #kindredclass
- #kindredcreativeteam
- #kindredfae
- #kindredposse
- #Kindredspirits
- #KindredStamps
- #kindredtown
- #kindredtownadultentertainment
- #kindredtownfastfood
- #kindredtownitalianandpizza
- #Kindredtowntoyandcraftstore
- #lanterncouple
- #laughs
- #LaurenTaylorMade
- #leadingladies
- #LeatherDaddy
- #legal
- #Lifeguard
- #Limitededition
- #londoncouple
- #Magicalfamily
- #makingwaves
- #merrykrampus
- #merrymintpaper
- #Midnightcouple
- #modernprincesses
- #monsterhugs
- #MotherMayI?
- #motorcyclestamp
- #murdermystery
- #nannyadventure
- #Nativity
- #newengland
- #NewOrleansManor
- #newrelease
- #NoWorries
- #OceanAdventurer
- #oceanbuddies
- #Ohana
- #oldsouls
- #onaroll
- #outofthisworld
- #Pandorable
- #Partners
- #PeggyMcCullar
- #petcare
- #pets
- #Picnicpals
- #Pirates
- #Pizzapaperpack
- #playpenpals
- #pocketwitches
- #ponypals
- #powerup
- #Prism Pals
- #pumpkinseason
- #racecardriver
- #rainbowpridepaper
- #ranchers
- #Recordplayerdie
- #Regency
- #RegencyElite
- #Retailworkers
- #retropaper
- #rideyourdreaams
- #rodeopaperpack
- #rootintootin
- #rosecouple
- #ROYALTY
- #safariadventures
- #safaricardie
- #saloonminialbumdie
- #sanitationworkers
- #SaveTheDay
- #Schoolbusdie
- #screamworthy
- #SeaMonsterKids
- #seasidecouple
- #Seasidepaper
- #sherwood
- #SillyGeese
- #smalltown
- #smooches
- #snowbuddies
- #snowfamily
- #SparkleBlends
- #spellbindingfamily
- #spookycitizens
- #spookycookies
- #spookycouple
- #spookyfence
- #spookytownpaperpack
- #spookytownroyalty
- #springcookies
- #standout
- #starcrossed
- #Sticktogether
- #Strawberry Paper
- #Summerween
- #Survivors
- #sweetgame
- #sweetpaper
- #sweets
- #sweettooth
- #Takeflight
- #Teacher
- #Tee-rific
- #thecutest
- #threetimes
- #titans
- #togetherforever
- #toriallen
- #tothefuture
- #TreasureKids
- #Tributes
- #tricksandtreats
- #TripleTheTrouble
- #troops
- #TuneIn
- #Unstoppable
- #unusualones
- #upanddown
- #vigilantejusticepaperpack
- #villagersclass
- #vintagekeydie
- #VintageVioletPaper
- #volume2
- #wackytroop
- #Warfriends
- #wayback
- #wildchild
- #wildwest
- #wintercookies
- #wishingcouple
- #witchesbrew
- #witchy
- #wizardapprentice
- #WoodlandAdventures
- #Workofart
- #x-ceptionalteam
- #YaaasQueen
- #youdidit
- #youmatter
- #youmatterkitclass
- 3D Card
- 3x3 card set
- 3x4 stamp
- 4"x6"
- 500 Fan Celebration
- 80s Girls
- @Strawberry house die
- @TheCraftBean
- A Bit Spotted
- Adoption
- adult coloring
- Aimee Ann
- Alberto Gava
- alcohol markers
- All The Feels
- Alphabet
- Amanda Stevens
- Amber MacMurtry
- Amelia Roe
- Amy Hurley Purdie
- Amy Moser
- Amy Purdie
- Angel Handmade Papercraft
- Anne Constantly Carding
- Anne of Green Gables
- Annette Allen
- Annette Santefort
- Annie Collins
- Annie Planner
- Annie Shark
- Annie's Adventures
- April Release
- Arabian Nights
- arcade friends
- Artsy
- Ashlea Cornell
- Ashlea Crafts
- ashleacrafts
- asian
- Assembly Tutorial
- ATC
- ATC Swap
- August Release
- autograph books
- autumn
- Baby
- Back in Time
- background
- Background Stamping
- Ballerina
- Ballet
- Bananas Box
- Basket Weave Stencil
- Basketball
- Bayou Buddies
- Be a Doll
- Be a Pineapple
- Beach
- Beaches
- Bear Hugs
- Bears with Feelings
- bee girls
- Beer
- bees
- Beth Duff
- Bigfoot
- Bikini
- Birds of a Feather
- birthday
- Birthday bites the dust
- Birthday Confetti Stencil
- blending
- Block
- Blog Hop
- Blonde and Ambitious
- Bloom
- Boat
- Bon Appetite
- Bookmark
- Booyah
- Born To Be Brave
- Box Card
- Brandi Mayott
- Breaking News
- Bri Firth
- Brick Stencil
- Bubbles Stencil
- Building Blocks
- Bundle
- Bunny Buddies
- Bursting Love
- Bus
- Cabaret
- Camper
- Camping
- Candy Cane Stencil
- candy man
- card
- Card Builder Basics Dies
- Card Crafting
- card maker
- Card Making
- Card Set
- card tutorial
- card-making
- cardmaker
- cardmaking
- Career Day
- Carolyn LaBille
- Carriage
- CAS Card
- Casita Familia
- castle
- Cat
- Catcher of Beasts
- Catherine Pooler Inks
- Celebrate Word Die
- Celebrations
- Center Window Picture Card
- Challenge
- Charity
- Chef
- cherry blossom
- Chevron Stencil
- Chicken
- Chickie Nuggies
- Childhood Friends
- childhood toys
- Chipmunks
- Chomp
- Chrissie Tobas
- Christine Riley
- Christmas
- Christmas Card
- Christmas Chaos
- Christmas Kid
- Chubby Mermaid
- Classic Love
- Classics
- Classified
- Clean and Simple
- Closet Chronicles
- Clown Mom Creations
- Clownmom Creations
- Coffee
- Coffee Crew
- Collaboration
- color challenge
- Colored Pencil
- coloring
- Coloring a Scene
- Come One Come All
- Comedian
- comic dots stencil
- Congrats
- Congrats Grad
- construction
- Cooking
- Cool Cat
- Cool Down
- Copic
- copic coloring
- Copic Markers
- Copic Markers Don't Mess With Me I'm Scrappy Judy Markowitz kindred stamps design team Kindred Stamps Fan Club Kindred Stamps FB Fan Challenge Plastic Friends Santa's Elf
- copics
- Cosmic Dots
- Costume Crew
- Cotton Candy Day
- Country Quilt Stencil
- Courtney Kreeber
- Courtney's Paper Crafting
- courtneys paper crafting
- Crab
- Crafting Love
- craftinglovew
- Crazy About You
- Cupid's Crew
- Curiouser and Curiouser
- Cursive Curses
- cute critters
- Daggdesigns
- DaggDesigns Blog
- Dalmatian
- dauber
- Dawn Lewis
- Day of the Dead
- December Release
- Delicata
- Demon Hunters
- Denielle Whicker
- design team
- Design Team Announcement
- design team call
- Design Team Member
- Design Team project
- Detention Friends
- Deviled Egg Day
- Die Cuts
- Die Cutting
- Digital Stamps
- Dina's Designs
- Dino Park
- Dinosaur
- distress backgrounds
- Distress Ink
- Distress Oxide
- distress oxide bleaching
- Distress Oxides
- Dive Right In
- diy cards
- Doctors
- Dog
- Doll
- Don't Mess With Me I'm Scrappy
- Doodle Lowercase Stamp set
- Doodle Uppercase Stamp Set
- Doodlebug Designs
- Doodles
- Doodles Alpha
- Doodles Paper Playground
- Dope
- Double Slider
- Downstairs Family
- Drag
- Drag Life
- Drag Queen
- Dragon Scales
- Dumpling
- Dwarfs
- Earth Day
- Easel card
- Easter Treats
- Educational
- Eggstra Annie
- Egypt
- Ele-Fun
- Electrifying
- Electrifying!
- Elf
- Embossing
- embossing folder
- Embrace your differences
- Emotinally Attached
- En Pointe
- Enamel Dots
- Extended Familia
- Extended Spooky
- Extra Super
- Facebook Live
- Fairy Tale
- Fairy Tale Swamp
- fall
- Family
- Family Additions
- Family is Forever
- Family Time
- Famous Last Words
- Fan Club Challenge
- Fan Creations
- Fanciful Spaces
- Fantastic Kit Class
- Fashion Boss
- Father's Day
- Fawn Kuehne
- feature
- February Release
- Festive Furries
- Festivus
- Firefighter
- Firetruck
- Flamingo
- Flashcards
- Floatie
- Floral Alpha
- Flowers
- Football
- Forest Elves
- Forest Friends
- Forest Stencil
- Forests
- fox
- France
- Fresh Squeezed
- Frida
- Frida Kahlo
- Friday Feature
- Friends Furever
- Friends with Pep
- Friendsgiving
- Friendship
- Full of Pride
- Fun
- Fussy Cutting
- G'Day
- Gal Pals
- Galactic Adventures
- Galactic Adventures: The Sequel
- Galactic Adventures: The Third
- Galactic Descendants
- Galactic Desert
- Galactic Fighters
- Galactic Origins
- Galaxy Background
- Galaxy Sidekicks
- Game On
- gel pen
- Genie
- Get Inked
- Ghosts
- Gift Card
- Gina Crotchfelt
- Gingerbread
- Girl Gang
- Girl Power
- giveaway
- glitter
- Glitter Gloss
- glitter hair
- glitter paper
- Glitz Glitter Gel
- Go Kart Die
- Go Team
- Gobble Me
- Goblin King
- Golden Age
- golf
- Good Tidings
- Graduation
- Grate Stencil
- Great Outdoors
- Greeting Cards
- Groovy
- Guest Designer
- Ha Ha Ha Shaker
- Hair in the Air
- Halloween
- Halloween Cards
- handmade
- handmade card
- Handmade Cards
- Hang Around
- Hannah Rubenstahl
- Hannukah
- Happily Ever After
- Happy Accidents
- Happy Afterlife
- Happy Birthday
- Happy Hanukkah
- Happy Haunting
- Happy Little Trees
- Happy New Year
- Have A Ball
- Hayley Warren
- Heart Layers Stencil
- hearts
- Hearts and Dots
- heat embossing
- Heather Tyler
- Heaven and Hell
- Hedgehog
- Hello
- Hello Summer
- hero
- heroine
- HERstory
- Highland Travelers
- Hip Hippo Hooray
- Hippie
- Hippo
- History Makers
- Hockey
- Holiday Ballet
- Holiday Bandits
- Holiday Challenge
- Holiday Sweets
- Holidays
- Holidays are a Nightmare
- Hollywood
- Hoodie
- Hoodwinked
- Horny
- Horror Hotel
- Horror Sequel
- Horse
- Hot and Cold
- How To
- Hustle
- I Dissent
- I Need Space
- I'm Wishing
- I'm Wishing Friends
- Icons
- ink blending
- Inseparable Friends
- interactive
- Interactive Card
- International Bagpipes Day
- Iron On
- It's About Time
- It's Magic Shaker
- January Release
- japan
- Japanese
- Jenn Bena
- Jenn Gross
- jenn paar gross
- Jennifer Fox
- Jennifer Gross
- Jessica MayDay
- Joanne Soukup
- Journey Home
- journeycoachjenn
- Judy Markowitz
- July Release
- June 2017 Release
- June Release
- Just a Note by Justin
- just-because cards
- Justice is Served
- Justin Averill
- Kel Acopan
- Kerri Boucher
- Kick Some Grass
- Kim Huffman
- Kindred Birthday
- Kindred Camping
- Kindred Christmas
- Kindred Gets Naughty
- Kindred Plans
- Kindred Plans: Adulting
- Kindred Plans: Emotions
- Kindred Plans: Healthy
- Kindred Plans: Hobbies and Friends
- Kindred Plans: Pets
- Kindred Plans: Vacations
- Kindred Plans: Weather
- Kindred Plans: Work
- Kindred Rockers
- Kindred Stamper
- Kindred Stamps
- kindred stamps design team
- Kindred Stamps Fan Club
- Kindred Stamps FB Fan Challenge
- Kindred Stamps Video Design Team
- Kindred Summer
- Kindred Travel
- King
- Kitties
- konnichiwa
- Kraft
- Land Princess Digi
- Last Chance
- Lauren Taylor
- Learning is an Adventure
- Leave Your Mark Annie
- Legendary
- Legends
- Lemonade Stand
- Lemons
- Let Us Eat Cake
- Let's Get Lit
- Life's A Ride
- Lifesavers
- light up card
- Lil Stinker
- Limited Edition
- little green men shaker pack
- Little Town Life
- llama
- Llama Get This Straight
- Loch Ness Monster
- Lochness
- Lois Bak
- Long Hair Don't Care
- long hair stencil
- Love
- Love Bites
- Love Bugs
- Love Letter
- love you
- Lucha Libre
- Lucky
- Lynnea Hollendonner
- Mad Crafters Tea Party
- Magic Show
- Magical Alphabet
- Magical Creature
- Magical Friends Collaboration
- Magnetic Bookmarks
- Make A Wish
- Mammories
- Manor Haunts
- March
- March Release
- Marcia Caradinta
- Mardi Gras Beads Stencil
- Mardi Gras Majesty
- Mari Clarke
- Maria Russell
- Maria Russell Designs
- Marie Heiderscheit
- Marie Nicole Designs
- Mary Polanco
- masculine
- masking
- Mass Producing
- Masters of Magic
- May 2018 Release
- May 2019 Release
- May 2020
- May Release
- May the Fourth Be With You
- Medallion Stencil
- Medusa
- Megan Hayashi
- Memo Pad Holder
- Merchandise
- Mermaid
- Mermaid Scales
- Merry Unicorns
- Merry Whatever
- Merry XXX-mas
- Metal Die
- Metal Friends
- Metallic Markers
- Mexico
- Midnight Movie
- Military
- Mindy Beverly
- Mindy Beverly Art Studio
- Mine Workers
- Mini Monsters
- Mini Pocket Letter Swap
- Molly Dagg
- Mom
- Monkey Around Day
- Monster
- Monster Hunter
- Monthly Release
- Moon & Stars Stencil
- More than one sentiment
- Morocco
- Motel Family
- Mother's Day
- mouse
- Movie Star
- Music
- music card
- Musician
- Musician Annie
- Musicians
- Must Love Dogs
- My Clever Creations
- mythical beast
- Mythical Kraken
- National Barnyard Animals Day
- National BBQ Day
- National Cheese Day
- National Coffee Day
- National Voodoo Doll Day
- National Yoga Day
- Naughty Animals
- Naughty Candy
- Naughty Fairytale
- Naughty Pick Up Lines
- Naughty Police
- Neha Tulsyan
- Never Grow Up
- New Product
- New Release
- New Year's Eve
- Niccole
- Niccole Sather-Kulig
- Nigeria
- No Line Technique
- North Pole
- notebooks
- Notepad Holder
- November Release
- Nurses
- Nuts About You
- Nuvo Drops
- Nuvo Glitter Paste
- NY Comedy
- ocean
- Ocean Royalty
- Ocean Scene Craft Die
- October Release
- Off to See The Wizard
- Once Upon a Nap
- One For Me
- one layer cards
- Onyx Glitter Gloss
- Opossum
- Optical Illusion Stencil
- ornament
- Out of the Bag
- Outdoors
- Outer Space
- Owl Post
- owl post shaker pack
- Palm Leaf Stencil
- Paper and Me
- Paper Crafting
- paper crafts
- Paper Pack
- Paper Piecing
- papercrafting
- papercrafts
- Park Cuties
- Party
- Party Animals
- party favor
- Party Hard
- party invitation
- party like a rockstar
- Party Like It's 1922
- Path Finder
- Patriotic Pals
- Patterned Paper
- Peace and Love
- Peacock
- Perfect Match
- Perky Penny Paper Arts
- Pick Your Poison
- Pilot
- Pineapple
- Pirate
- Pixie Dust
- Pixie Map
- Plane Awesome
- Planets
- Planner
- Planner Annie
- planner dashboard
- Planner Design Team
- Planner Layout
- Planner Pouch
- Planner Spread
- Planner Tracker
- Plastic Friends
- Play In the Sand Day
- Play Pretend
- plumber brothers
- Police
- Police Car
- Polynesia
- Polynesian
- Polynesian Adventurers
- Pool
- Pool Party
- Poop
- pop culture
- Pop Up Box Card
- Pop-culture
- Porcupine
- Postal Worker
- Postal Worker Appreciation Day
- power pack
- Practically Perfect
- Pre-Order
- Pregnant
- Prehistoric Alphabet
- Prehistoric Family
- Pride Parade
- Prince
- Princess
- Prismacolor
- Prismacolor Colored Pencils
- Protectors of the Throne
- Puck
- Pull and Slide Die
- puppy
- Puppy Love
- Quick and Easy Cards
- R Winn Creates
- R. Winn
- raccoon
- Rachel
- Rachel Bergfeld
- Rachel Winn
- Rags to Riches
- Rain or Shine Annie
- rainbow
- rainbow card
- Randy Nguyen
- Ranger
- Rat
- Raven Mad
- RBergfeld Card Designs
- Redneck
- Relationship
- Release Week
- repetitive stamping
- Retro Diner
- Retro Diner Paper Pack
- Reverse Galaxy Background
- RGB
- Rhino
- Rianna Fenning
- ride
- Rock Climbing
- rock on
- Rock Out
- Rock Stars
- Rockin'
- Roller Skating Day
- Royal Throne
- Russian Doll
- S'mores
- Salem Sisters
- Salima Abdullah
- Salty but Sweet
- Sand
- Sandra Blasius
- Santa's Elf
- Sassy & Crafty
- scene building
- scene card
- School
- School Bus
- Science Geeks
- scrapbook
- scrapbooking
- Scrapbooking Paper
- Scrappy Boy
- Scuba
- sea
- Sea Friends
- Sea Friends Shaker
- sea monster
- Seahorse
- Sean Covert
- Seas the Day
- Secret Agent
- Sentiments
- September Release
- Sequin
- Sequins
- Sexy Friends
- Shaker Card
- Shaker Card tutorial
Marcia
November 15, 2018
What a fabulous card! I adore your little easel!! So cute and creative!